How to Operate an Excavator: A Beginner's Guide
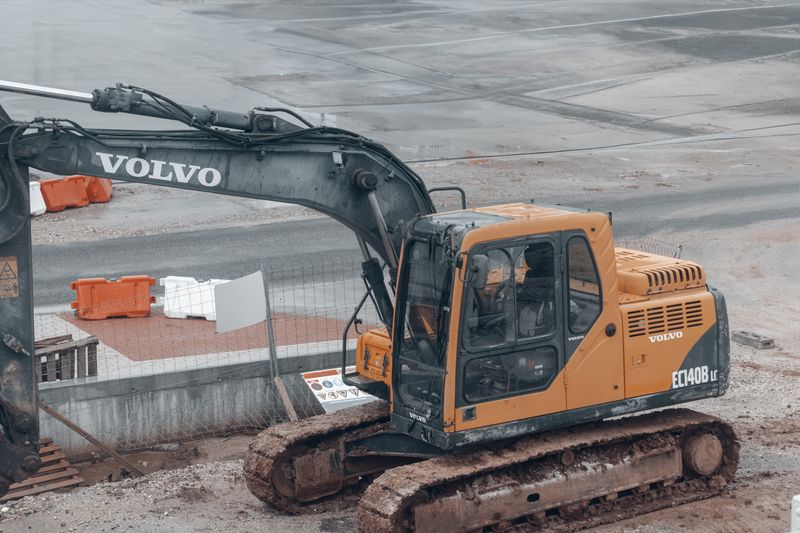
Learning to operate an excavator is one of the most valuable skills in the construction trades. The machine looks intimidating at first—two joysticks, multiple foot pedals, and a 360-degree rotating cab sitting on top of a tracked undercarriage. But the fundamentals are learnable, and most people develop basic proficiency within a few hours of seat time.
This guide covers everything a beginner needs to know: pre-operation checks, understanding the controls, executing basic movements, proper digging technique, and the safety rules that protect you and everyone around you.
A note on training: Operating an excavator without proper instruction is dangerous. While no federal license is required to operate an excavator on private property, most commercial job sites require operators to hold a certification from a recognized program such as the National Commission for the Certification of Crane Operators (NCCCO), NCCER, or an equivalent manufacturer-certified program. This guide is educational—supplement it with hands-on training from a qualified instructor.
Step 1: Pre-Operation Inspection
Before you ever climb into the cab, perform a thorough walkaround inspection. This is not optional—it’s both a safety requirement and a baseline for catching problems before they become expensive breakdowns.
The Walkaround Checklist
Undercarriage:
- Check track tension on both sides. Tracks that are too loose can derail; too tight accelerates wear.
- Inspect rollers, idlers, and sprockets for visible damage or unusual wear patterns.
- Look for missing track pads or damaged hardware.
Hydraulic system:
- Inspect all visible hydraulic hoses and fittings for leaks, cracks, or chafing.
- Check the hydraulic oil level at the sight glass (typically located on the side of the machine).
- Look underneath and around the boom pivot points and cylinder rod ends for any seepage.
Engine compartment:
- Check the engine oil level with the dipstick.
- Inspect the coolant level at the overflow reservoir.
- Check the fuel level and look for fuel leaks.
- Inspect the air filter indicator—many modern machines have a restriction indicator visible from the ground.
- Inspect the fan belt for cracking or fraying.
Boom, arm, and bucket:
- Walk along the full length of the boom and arm, inspecting for cracks, dents, or weld failures.
- Check all bucket pins and retaining pins—they should be fully seated with cotters or hardware in place.
- Inspect the bucket cutting edge for excessive wear or missing teeth if applicable.
Cab and access:
- Check that all mirrors are adjusted and clean.
- Inspect the windshield for cracks that could affect visibility.
- Ensure the handrails, steps, and anti-slip surfaces on the cab access are intact.
Document and report: Any deficiencies found should be logged in the equipment inspection record before operating. Do not operate a machine with known safety defects.
Step 2: Mounting the Machine Safely
Always use three points of contact when mounting or dismounting an excavator—two hands and one foot, or two feet and one hand, always in contact with the machine.
- Never jump off an excavator.
- Face the machine when climbing up or down.
- Never carry tools or materials in your hands while mounting.
Once in the cab, adjust the seat before starting the engine. Your feet should rest flat on the floor mat with a slight bend in the knee, and your back should be supported by the seat back. You should be able to operate both joysticks comfortably without reaching.
Step 3: Cab Familiarization
Before you start digging, familiarize yourself with the cab layout. Modern excavator cabs share a common layout regardless of brand.
Main Controls Overview
Joysticks (left and right): Control the primary work tool functions—boom, arm, bucket, and swing. The exact assignment depends on the control pattern (ISO vs. SAE—covered below).
Travel levers/pedals: Two levers or pedals at your feet control left and right track independently. Push both forward to travel forward; pull both back to reverse. Push one at a time to turn.
Foot pedals (auxiliary): On machines with a hydraulic attachment, a foot pedal typically controls the auxiliary hydraulic circuit (e.g., for a breaker or grapple). Some machines use a thumb-operated switch instead.
Throttle: Controls engine speed. Most operators run at full throttle during digging operations for maximum hydraulic pressure and response. Use low throttle for precise work or when traveling.
Monitor/control panel: Displays machine vitals—engine temperature, hydraulic oil temperature, fuel level, service alerts. Learn to read it before you need to.
Quick coupler control (if equipped): Usually a guarded switch or valve that locks/unlocks the attachment. Always verify the coupler is locked before lifting.
Step 4: ISO vs. SAE Control Patterns
This is the single most important concept for a new excavator operator to understand. ISO and SAE are two different joystick control patterns that assign machine functions differently. Most modern machines default to ISO, but many can be switched between patterns.
ISO (International) Pattern
| Control | Left Joystick | Right Joystick |
|---|---|---|
| Forward/Back | Arm in/out | Boom up/down |
| Left/Right | Swing left/right | Bucket curl/dump |
SAE (North American) Pattern
| Control | Left Joystick | Right Joystick |
|---|---|---|
| Forward/Back | Boom up/down | Arm in/out |
| Left/Right | Swing left/right | Bucket curl/dump |
The critical difference: ISO puts arm on the left stick, boom on the right. SAE puts boom on the left, arm on the right. Operators who have trained on one pattern will have deeply ingrained muscle memory for that pattern.
Never switch control patterns mid-operation. If you’re renting a machine or jumping onto someone else’s equipment, confirm the control pattern before you make a single movement. An unintended swing on a loaded machine can be fatal.
Step 5: Starting the Engine
- Ensure the travel levers/pedals are in the neutral position.
- Make sure the hydraulic lockout lever (typically a gate lever on your left side) is in the locked/raised position—this prevents accidental hydraulic movement.
- Insert the key and turn to the preheat position if required (cold weather operations may need 5–15 seconds of glow plug preheat).
- Start the engine and let it idle for 3–5 minutes before applying any hydraulic load. This allows hydraulic fluid to warm and circulate.
- Lower the hydraulic lockout lever to the unlocked/lowered position when ready to operate.
Step 6: Basic Movements
Practice these movements individually before combining them.
Boom Up/Down
The boom is the first major arm segment attached to the house. Raising the boom lifts the entire arm-bucket assembly. This is used constantly—to clear obstacles, position for a new dig cycle, and load trucks.
Practice: With the bucket above ground, raise and lower the boom in small increments. Feel the hydraulic response at different throttle settings.
Arm In/Out
The arm (sometimes called the dipper or stick) is the second segment. Moving the arm “in” curls it toward the machine; moving it “out” extends it away. Arm movement is the primary driver of digging action.
Practice: Extend the arm fully out and curl it fully back in while keeping the boom stationary. Note how the bucket moves through an arc.
Bucket Curl/Dump
The bucket rolls on the end of the arm, controlled by the bucket cylinder. “Curling” the bucket closes it to scoop material; “dumping” rolls it open to release material.
Practice: Practice filling and emptying the bucket over a pile. Focus on the timing of the curl—beginning the curl too early wastes the penetration force of the arm.
Swing
The house (cab, engine, and front attachment) rotates 360 degrees on the undercarriage. Swing is used to move from the dig zone to the dump zone and back. It’s also one of the most dangerous movements—a swinging counterweight or bucket can strike personnel or obstacles.
Practice: Do slow, deliberate left and right swings. Practice stopping precisely at a target point without overshooting.
Travel
Traveling on tracks is counterintuitive at first. The standard orientation has the travel motors at the rear—when you’re facing forward in the cab, the idlers are in front and the sprockets/drive motors are behind. If you’ve swung the house 180 degrees (which happens constantly during digging operations), the controls will feel reversed.
Always check the orientation of the house relative to the undercarriage before traveling. Many beginners damage equipment or create hazards by traveling in the wrong direction.
Step 7: Basic Digging Technique
A proper dig cycle has four phases:
-
Position: Extend the arm out to the target dig area. Lower the boom until the bucket teeth contact the ground at the desired starting point.
-
Penetrate: Crowd the arm in (toward the machine) while keeping the bucket in the curl position. The bucket should bite into the material. If the machine is struggling, you may need to reduce the depth of cut.
-
Load: As the arm reaches approximately vertical (directly below the boom), begin curling the bucket to trap the material. Raise the boom slightly to clear the cut.
-
Swing and dump: Swing to the spoil pile or truck, dump the bucket, then swing back to start the next cycle.
Tips for Efficient Digging
- Use the arm for 80% of the cut, the boom for positioning. Most of the work is done by crowding the arm in; the boom primarily positions the bucket at the start and clears it at the end.
- Match your depth of cut to the machine’s capability. Taking bites that are too deep stalls the hydraulics and is hard on the machine.
- Keep the swing angle small. The most efficient operations minimize the swing arc between the cut and the dump. Position the truck or spoil pile as close as safely possible to reduce cycle time.
- Maintain a clean bench. Avoid letting loose material pile up at the cut face—it falls back into the trench and adds re-handling time.
Step 8: Critical Safety Rules
Swing Zone Awareness
The counterweight extends behind the cab and can strike personnel or structures. Always be aware of your tail swing radius, especially on zero-tail-swing or reduced-tail-swing machines where the sweet spot is smaller than expected.
Know Your Lift Capacity
Every excavator has a rated lift capacity that varies with reach and boom angle. Never lift a load you haven’t confirmed is within the machine’s rated capacity. Check the load chart posted in the cab.
Overhead Clearances
Utility lines kill operators every year. Before raising the boom, verify there are no overhead power lines, phone lines, or other utilities in the work zone. Maintain a minimum 10-foot clearance from energized lines unless the lines have been de-energized and grounded by the utility company.
Underground Utilities
Before any digging, confirm that underground utilities have been marked. In the United States, call 811 (the national dig safe number) at least three business days before digging. Striking a gas line or buried power cable is life-threatening.
Stability
Excavators can tip. Never swing a heavy load over the side of a slope, and avoid operating with the tracks running parallel to a steep grade. Travel up and down slopes with the heavy end of the machine (usually the counterweight) facing downhill for stability.
Common Beginner Mistakes
-
Not warming up the hydraulics. Cold hydraulic fluid is thick and sluggish. Rushing to full load before the fluid reaches operating temperature accelerates wear on seals and valves.
-
Incorrect control pattern assumption. Assuming ISO when the machine is set to SAE (or vice versa) leads to disoriented, dangerous movements.
-
Traveling with incorrect house orientation. Forgetting which way the drive motors are pointing and traveling in the wrong direction is a classic new-operator mistake.
-
Over-reaching. Extending the arm and boom to maximum reach before starting a dig dramatically reduces digging force and machine stability. Work at comfortable reach—roughly 75–80% of maximum.
-
Swinging too fast. Fast swing is efficient in experienced hands but leads to bucket overshoot and potential contact with personnel or structures for beginners.
-
Ignoring the monitor. Modern excavators generate alerts for hydraulic temperature, engine temperature, and service intervals. Ignoring warning lights leads to expensive failures.
Training and Certification Resources
If you’re serious about operating excavators professionally, pursue formal training through one of these pathways:
- NCCER (National Center for Construction Education and Research): Offers a Heavy Equipment Operations curriculum with structured competency assessments.
- Operating Engineers Local Union training: If you’re pursuing union work, apprenticeship programs offer comprehensive hands-on training.
- Equipment manufacturer courses: CAT, Komatsu, Hitachi, and Volvo all offer operator training programs, often tied to specific models.
- Community colleges: Many community colleges with construction programs offer heavy equipment operator courses with actual seat time.
Recommended Gear for the Cab
- ANSI Z89.1 hard hat — Required on virtually every commercial job site
- ANSI Z87.1 safety glasses — Protect from dust and debris during entry/exit and ground-level work
- Class 2 high-visibility vest — Required on DOT-adjacent and public works projects
- Steel-toed boots (ASTM F2413) — Non-negotiable for any heavy equipment environment
- Hearing protection — Extended cab time without ear protection leads to cumulative hearing damage
Final Thoughts
Operating an excavator well takes time. The controls become intuitive with seat time—the machine begins to feel like an extension of your hands. But the fundamentals covered here—pre-inspection, control pattern awareness, proper digging technique, and strict safety discipline—are the foundation for every skilled operator.
Start slow. Build good habits from the first hour. And always take the pre-operation inspection as seriously as the digging itself. The walkaround is where you catch the problem before it becomes the incident.

Ironworks Insider Editorial Team
Independent trade-focused editorial team