Motor Grader Operation Tips: Grading, Crown Cutting, and Blade Control
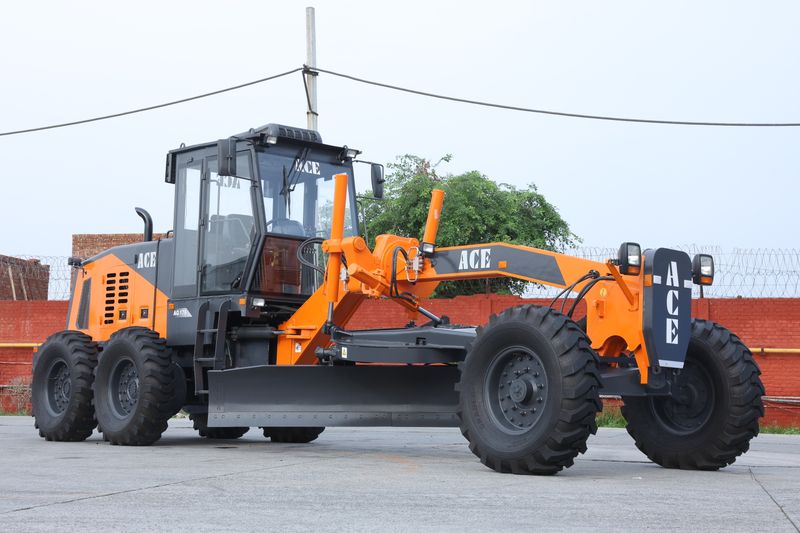
The motor grader is one of the most versatile and technically demanding machines in road construction and maintenance. It can create a smooth asphalt base, cut a roadside ditch, maintain a gravel road crown, reshape a slope, and spread windrow material — all with the same machine and a skilled operator. But it’s also one of the hardest pieces of equipment to run well.
Unlike a bulldozer or scraper where brute force does much of the work, a motor grader demands blade intuition — the ability to feel the material, read the grade, and make constant micro-adjustments to the 14-foot blade to produce a consistent finished surface. Operators who never develop that feel end up chasing waves and high spots all day. Operators who master it can finish a mile of road base in a shift that impresses even experienced superintendents.
This guide focuses on the practical operation techniques that separate average grader work from excellent grader work.
Understanding the Machine: Key Components
Before diving into technique, understand what makes a motor grader different from other equipment:
Blade (moldboard): The large angled steel blade is the working tool. It’s mounted on a circle assembly that allows it to rotate 360 degrees relative to the frame. Most blades are 12–16 feet wide on standard machines.
Circle and drawbar: The circle is the ring gear assembly that rotates the blade. The drawbar connects the blade circle to the main frame and can be shifted left, right, and angled front-to-back. This combination allows enormous flexibility in blade positioning.
Blade tilt: The moldboard can be tilted forward or backward. Forward tilt (top of blade tilted toward the front of the machine) is used for cutting hard material; backward tilt (top tilted rearward) is used for leveling and windrow work.
Blade side-shift: The entire blade can be shifted laterally along its mounting bar. This allows the blade to extend beyond the machine’s tire track on one side — essential for cutting ditches without putting the machine tire in the ditch.
Front axle articulation (lean): The front wheels can lean inboard to counteract side forces during blade cutting. This is one of the most important adjustments for maintaining a straight travel path while the blade is cutting at an angle.
Rear articulation (frame articulation): Most graders can articulate their rear frame to one side. This “crab walk” allows the rear wheels to track in a different position than the front wheels — useful for keeping rear wheels out of the cut or positioning the machine precisely.
Blade Setup Basics
Incorrect blade setup is the most common reason inexperienced operators struggle. Before you take your first pass, think through these settings:
Blade Angle (Circle Rotation)
The blade angle relative to the direction of travel determines how material flows off the blade. A blade rotated to approximately 45–55 degrees from perpendicular is standard for most grading passes:
- More perpendicular (less angle) = more material buildup ahead of the blade, better for spreading and mixing
- More angled (approaching parallel to travel) = material flows off the end of the blade into a windrow with minimal spread; better for ditch cutting and final cleanup
Blade Pitch (Tilt)
- Forward pitch (top of blade toward front): More aggressive cutting; better for breaking up hard or compacted material
- Neutral/slight rearward pitch: Standard for most grading and leveling passes
- Never run the blade with extreme rearward pitch during rough cutting — it reduces cutting ability and increases machine stress
Blade Side-Shift
Position the blade so the high (discharge) end of the blade is inside your tire track. If the blade overhangs outside your wheel track significantly, the machine will tend to be pushed sideways by material pressure — fighting the front axle.
Technique #1: The Crown Cut (Road Crown Maintenance)
Maintaining a road crown — the slightly arched profile of a gravel or dirt road that sheds water to the sides — is the most common motor grader task in road maintenance. The standard crown is a 2% cross-slope (approximately 1/4 inch per foot of road width).
Reading the Existing Crown
Before you cut, observe where the high points and wash lines are. Water tells you everything: water runs toward low spots, so puddles and ruts identify where the crown has been lost.
The Basic Crown Pass Technique
Pass 1 — Cut from the centerline to the right shoulder:
- Position the machine so the blade overlaps the centerline slightly.
- Set the blade at approximately 45 degrees, low point to the right (so material discharges to the right edge).
- Make a cutting pass from the centerline to the shoulder, cutting shallow — just enough to loosen and move the high-spot material.
- Build up the windrow at the right shoulder.
Pass 2 — Mirror pass from centerline to the left shoulder.
Pass 3 — Windrow cleanup: Switch the blade angle to push the shoulder windrows back toward center, or cut them out if they’re not needed.
Pass 4 — Final leveling passes: Use light passes with a nearly straight blade (less angle) to smooth the final surface, feathering out any ridges left by the cutting passes.
Common Crown Mistakes
- Cutting too deep on the first pass — creates a valley that takes many passes to correct
- Not maintaining consistent blade depth — operator fatigue causes the blade to float up and down, leaving waves
- Skipping the windrow cleanup — loose material left at the shoulder will wash back across the road in the next rain
Technique #2: Straight-Line Grading
On long road sections, maintaining a straight blade path is both harder and more important than it seems. Waves and diverging lines show clearly in the finished grade and are difficult to fix without essentially re-doing the pass.
Front wheel lean: When the blade is cutting at an angle, the side force pushes the front of the machine in the direction of material flow. Counter this with front wheel lean (lean the front wheels away from the direction material is flowing). Dialing in the right front lean makes the machine track straight without fighting the steering.
Articulate to the discharge side: A slight frame articulation toward the high end of the blade keeps the rear wheels parallel to the cut and helps the machine track true.
Reference points: Pick a consistent reference point at the end of the pass (a stake, a curb, a tree) and keep your eye on it, not on the blade. Operating by looking at the blade causes constant micro-corrections that create an uneven surface.
Speed: Most fine grading is done at 2–4 mph. Too fast and the blade bounces over high spots instead of cutting them; too slow and you’re inefficient. On rough initial passes, faster speeds (5–8 mph) are acceptable.
Technique #3: Ditch Cutting
Cutting a roadside ditch requires precise blade side-shift and often frame articulation to keep the machine in the desired position.
Blade setup for ditch cutting:
- Shift the blade fully to one side (right side for a right-hand ditch).
- Angle the blade so the low end is in the ditch and the high end is toward the road centerline.
- Tilt the blade slightly forward for more aggressive cutting into the ditch wall.
- Lean the front wheels away from the ditch (into the road) to counteract the side force from the ditch wall.
The approach:
- Travel with the right front wheel on the edge of the ditch slope — not in the ditch
- Maintain consistent blade depth; the low end of the blade is cutting the ditch bottom, the upper portion is cutting the slope
- Articulate the rear frame toward the road side to keep rear wheels away from the unstable ditch edge
Depth control: Most roadside ditches are cut to a depth of 12–24 inches below the road edge. Set your first pass shallow and deepen with subsequent passes — trying to cut full depth in one pass stalls the machine and produces rough results.
Technique #4: Windrow Management
Material that accumulates ahead of the blade must be managed — either spread across the surface or moved to a final disposal point. Leaving windrows creates ridges that harden and are difficult to remove later.
Spreading a windrow:
- Travel parallel to the windrow
- Set the blade at a shallow angle and a slight depth to bite into the windrow
- Spread in the direction of crown (toward the shoulder)
Pushing a windrow (for shoulder disposal):
- Set the blade nearly perpendicular and raise the discharge end of the blade slightly
- Push the windrow forward along the road, building it up, then turn and dump it over the shoulder
Working a windrow back into the road:
- After grading a section, use the blade to pull material back from the shoulder windrow into low spots before the final leveling pass
Technique #5: Fine Grading for Asphalt Base
Finish grading for an asphalt overlay is the most demanding grader work — tolerances are typically ±3/8 inch over 10 feet, and any waves or bumps will telegraph through the finished asphalt.
What makes the difference:
-
Grade control system: Modern graders equipped with 2D or 3D grade control (Trimble, Topcon, Leica) dramatically reduce the skill requirement for finish grading. The system automatically adjusts blade height to match the design surface. For contractors doing significant paving base work, this is a strong investment.
-
Check grade constantly: Use a 10-foot straightedge or a grade rod and level every 50 feet to verify you’re hitting target grade. Adjust blade pressure to correct areas before they get too far ahead.
-
Work in cross-passes, not just down-the-road: Crown and transverse slope require passes at a slight angle to the road centerline to correctly form the surface profile. Don’t just make parallel passes — you’ll end up with a flat but uncrowned surface.
-
Slow down significantly: Final passes at 1–2 mph produce a much smoother result than faster passes. Speed fights precision.
Scarifying: Loosening Hard Material
The ripper or scarifier assembly on the back of many motor graders is used to break up hard, compacted material before grading. Here’s how to use it effectively:
- Set tine depth to approximately 2–4 inches in most applications (too deep and the machine stalls; too shallow and it bounces over the surface)
- Run scarifier passes first, then follow with grading passes
- Stagger scarifier passes slightly with each run to break up any untouched ridges between tines
- On very hard material, make multiple shallow scarifier passes rather than one deep pass
Grader Maintenance Notes Specific to Operation
Circle and ring gear: The circle is constantly under load during any blade-angle cutting. Keep the ring gear lubricated per the manufacturer’s schedule (typically every 10 hours). Dry ring gear wears rapidly and can cost several thousand dollars to replace.
Blade end bits and cutting edge: The blade cutting edge wears down over time. End bits (the outer corners of the blade) wear the fastest. Replace them when they’re worn within 1 inch of the blade moldboard. Running on bare moldboard damages the expensive blade plate. Replacement cutting edge segments: $50–$150 each; end bits: $80–$200 per set.
Tire pressure: Motor grader tires are often run at specific pressures for different work types. Check OEM specifications. Wrong tire pressure affects traction, fuel efficiency, and turning response.
Recommended Equipment and Accessories
- Spectra Precision HL760 Laser Receiver — mounts to the blade, receives laser from a rotating grade laser, enables single-operator precision grading without a grade checker walking the site
- Trimble GCS900 Grade Control System — full 2D blade control for fine grading; compatible with major grader brands; highly recommended for operators doing extensive paving base work
- Oregon Cutting Systems Motor Grader Blade End Bits — OEM-equivalent end bits for CAT, Komatsu, and John Deere graders; stocked at most major equipment dealers
- 10-Foot Aluminum Straightedge (Pacific Laser Systems) — essential for checking grade tolerance during finish passes; lightweight and easy to handle solo
Bottom Line
Motor grader operation is a craft that takes years to fully master, but the fundamental techniques — blade angle, machine lean, windrow management, and steady speed — can be learned and improved rapidly with deliberate practice. The operators who become known for exceptional grader work are those who stop fighting the machine and start listening to it: feeling how material flows off the blade, sensing when the front axle is pushing off the cut, and making the small adjustments before they become big corrections.
Know your machine’s controls intuitively before you try to grade anything to tolerance. Practice on rough material first. And when you’re doing finish grade — slow down.

Ironworks Insider Editorial Team
Independent trade-focused editorial team